AI video tools have made content creation faster than ever. You can type a prompt and get a video in minutes. But there’s one problem: most of these videos don’t look ready to publish.
They often feel rough, blurry, or slightly “off.” The good news? You can fix that. In fact, you don’t need to start over. In most cases, you can fix and improve what you already have. The tools like Vmake make this process much easier.
Wondering how you can do that?Let’s look at how you can improve low-quality AI videos using Vmake’s video quality enhancer.
Why Generative Videos Look Low Quality
Before fixing anything, let us understand what’s causing the problem in the first place. Most generative videos aren’t meant to be final outputs. Instead, they’re more like a first draft. Here’s where things usually go wrong:
Lack of Fine Detail
AI tools often miss small details. Textures and edges can look slightly distorted. At a glance, the video may seem fine, but the closer you look, these flaws stand out.
Low Resolution Output
Many AI video tools generate content in lower resolution to keep things fast. This can make your video look blurry on larger screens.
Frame Inconsistency
You might notice slight flickering or shifting between frames. Objects can move unnaturally, and faces may change subtly. This happens because each frame is generated separately, which can lead to small mismatches.
Unnatural Lighting
Most creators often report this issue. Some areas may look too bright, while colors can appear uneven across scenes.
Motion That Feels Off
Even if everything looks okay visually, movement can feel unnatural. It might be too smooth or slightly delayed. This makes the video feel less real.
Compression Issues
When a video is created, it is often compressed. Compression makes the video file size smaller but also makes it less detailed and less sharp.
How to Fix Low-Quality Videos with Vmake Video Enhancer
Once you know what’s causing the issues, the next step is fixing them. You don’t need complicated editing software. Vmake AI Video Enhancer can handle most of the work for you. Here’s how you can fix this:
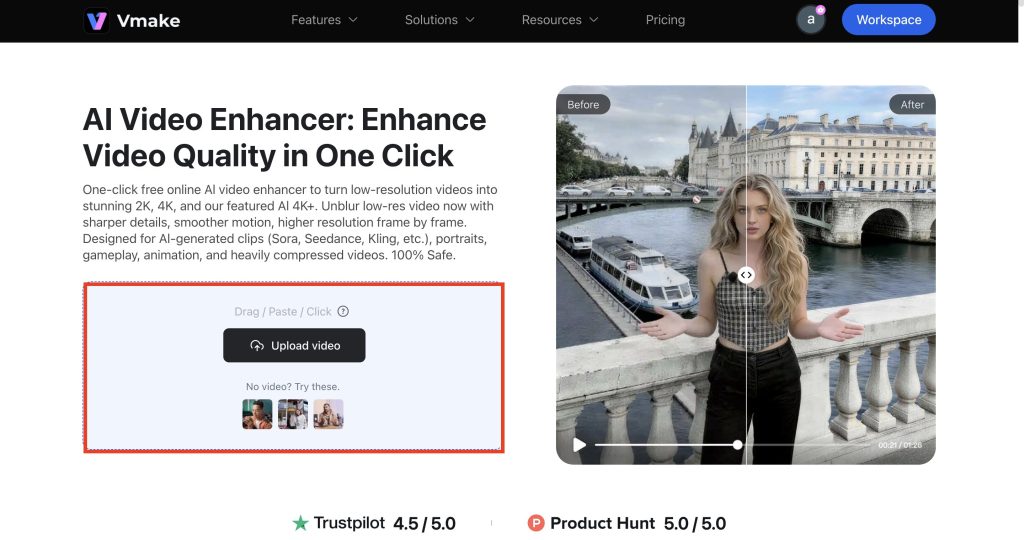
Step 1- Upload Your Video
Upload your AI video to the platform. Make sure you use the highest quality version you have. It’s because small differences in the original file can affect the final result.
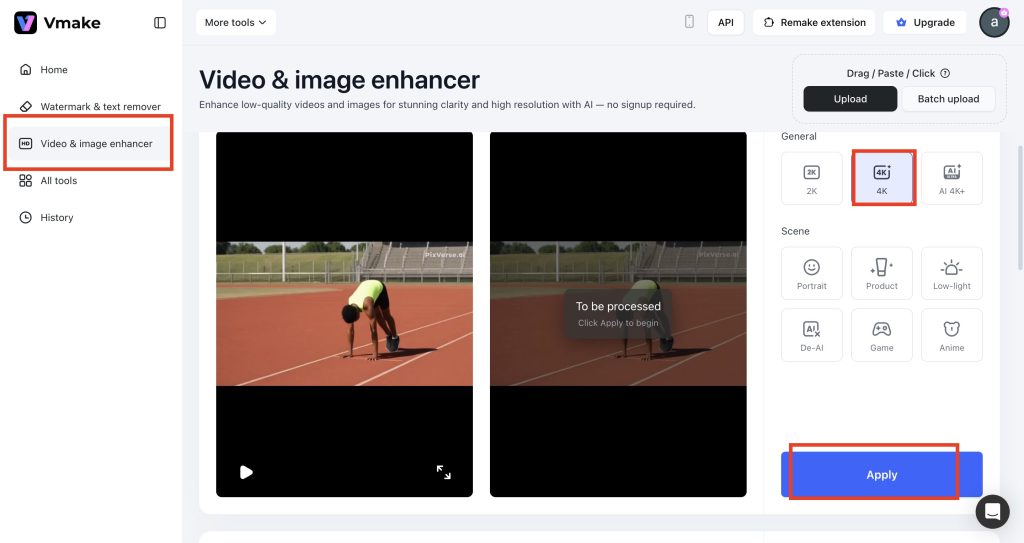
Step 2- Automatic AI Video Enhancement
After uploading, Vmake automatically selects the best enhancement model. You can also manually choose 2K or AI 4K+. Pick from Specialized options such as Portrait and Anime videos. This ensures your content looks sharp and professional.
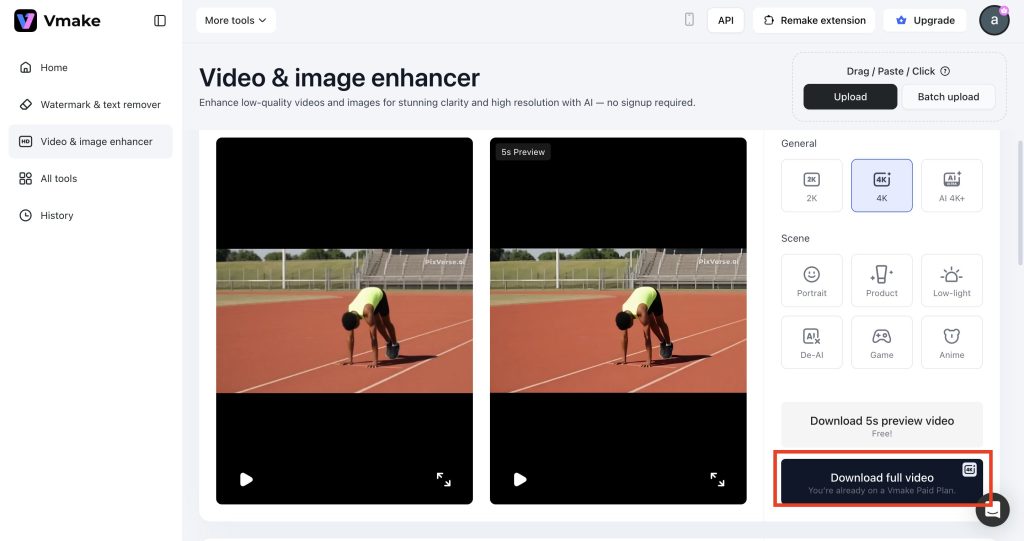
Step 3- Download Your Enhanced Video
Preview your improved video and choose the desired format. Once everything looks good, click “download”.
Now, your video is polished and optimized for usage in different platforms.
Common Mistakes to Avoid While Fixing Low-Quality Generative Videos
Even when using the Vmake video enhancer, it’s easy to make mistakes that reduce video quality. Hence, always watch out for:
Over-Sharpening
Too much sharpening using the Vmake video enhancer will make the video look unnatural. One should make minor adjustments to achieve the best look.
Ignoring Original Quality
Enhancement can’t do so much if the original quality is poor. Start with the best AI-generated video you have, because even the video enhancers cannot fully fix extremely low-resolution clips.
Overdoing Color Adjustments
Boosting saturation or contrast too much can make colors appear fake. Use the Vmake video enhancer’s color tools to maintain balanced, natural tones.
Skipping Noise Reduction
Upscaling a noisy video can make the grain noticeable. Always use the Vmake video enhancer’s noise reduction before sharpening the resolution.
Using Multiple Tools Randomly
Stacking effects from different apps can create distortions. The video enhancer handles most enhancements in one workflow.
Not Reviewing the Final Output
Always preview your enhanced video on multiple screens. Specifically, check the video for pixelation. If you find any errors, enhance the video once again.
Rushing the Process
Trying to enhance a video too quickly can lead to mistakes. Take your time with each adjustment. Always review your work carefully to get the best results.
5 Editing Tips to Improve AI Videos
Even a rough video can look polished with a few smart adjustments. Here is what you can do about this.
1. Upscale Strategically
Increase resolution for clearer visuals while focusing on the parts that matter most. This includes faces or product shots. This brings attention to key details without overloading the file.
2. Enhance Key Colors
Instead of adjusting the whole video, target key elements like a subject’s clothing or branded items. Highlighting these areas naturally makes the video pop.
3. Stabilize Shaky Footage
If the video jitters, apply stabilization. Even small shakes can make a video seem dull, so smoothing can instantly improve watchability.
4. Use a Video Watermark Remover
Always use a good video watermark remover. Remove distracting logos or default AI marks to make your video clean and professional. This step alone can make the content feel polished without touching other settings.
5. Emphasize Important Frames
Add a touch of brightness to important frames. This will ensure that the viewers’ attention is focused on the most important actions. In due course, it will boost the quality.
6. Crop and Reframe
Sometimes AI videos include unnecessary background or empty space. Cropping to focus on the subject improves composition and draws viewers’ attention to what matters most.
Final Thoughts
So, that’s all on fixing generative video quality with Vmake video enhancer. All you need to do is just add your videos to the tool and leave the rest to the AI. You can get the best results within a few seconds.
Even though the tool provides quality videos on the first go, you may still stick to the post-production tips as shared above. This can eventually help you create a video that is engagement-friendly.